How to make greeting cards. How to make a beautiful postcard with your own hands? Surprise card: step by step production
On March 8, on a birthday or an anniversary, I would like to congratulate my beloved mother sincerely, from the bottom of my heart.
Buying a ready-made postcard in any design is currently not a problem.
But how many emotions will mom get if you give her a handmade card?
Handmade postcard is not just a small bonus to the main gift, but a real testament to the love and appreciation of a sweet mommy. Such a souvenir will be kept by mom in a conspicuous place for many years.
Such a postcard is always very beautiful, elegant, original, easy to make and does not require much time and material investments. Be sure to find a suitable option for yourself and create a postcard with your own hands - please your loved one!

As a basis, you can take cardboard of a soft cherry shade, cut a rectangle out of it. Next, we take cardboard in a box and cut out a figure from it in an arbitrary form up to half of our cherry base, glue it, decorate the place of gluing with exquisite white lace. We decorate the card with bows, beads and buttons, add good sincere congratulations and our surprise for our beloved mother is ready!

The basis of the postcard will be the same cardboard. We glue two strips of fabric of different widths onto the base. On the upper wide strip, you can stick the words "mother" with letters cut out of different cardboard. We leave the bottom strip for decor and warm words of congratulations. The decor can be ribbons, beads, pieces of lace, various flowers, in general, everything that your imagination tells you.

The basis of the postcard will be white or other light cardboard. On top of the cardboard we glue flowers, leaves, hearts, ladybugs, cute birds, etc. in the form of an application. colors must be chosen very competently - no more than 3 shades so that your postcard looks harmonious. For volume, you can add beads, laces, buttons.
Do-it-yourself birthday card for mom from paper in stages.
For this we need:

To work, you still need to print on a printer vase template.

Do you like such a miracle made on your own?
Unusual and voluminous
If you have a desire to make a complex and unusual birthday card, there are many such options.
Which one is right for your mom is up to you. Each of them is original, beautiful and easy to perform in its own way.

Gorgeous and original
If you really want to give mom something more complex, give her something that will truly surprise and give positive emotions.
Take some of your precious time and create a 3D postcard, or postcard from unusual materials. This is not at all difficult to implement, but it will take a little more time, as well as patience and perseverance, attention and painstaking work. But such a masterpiece will be really appreciated and will cause a flurry of positive emotions!

Master class "How to make an endless postcard?" see our video:

You can bring your own flair, change colors or materials, add missing decor elements in your opinion, etc. but most importantly - kind, warm and sincere words for your beloved mother!

Beautiful birthday card for my beloved mother
In order to create such an unusually beautiful postcard, you will need:
- double-sided cardboard coated white;
- paper with verses, it is possible with notes, with the effect of aging;
- - artificial leaves and flowers;
- - two round stickers with congratulatory inscriptions;
- - blue ribbon
- - colored sequins;
- - a sticker or a pre-printed inscription "Congratulations!";
- - pencil, scissors, ruler, double-sided tape, glue.
Let's get to work.

In conclusion, I would like to note that in your own handmade card for your beloved mother, the most important thing is not paper, ribbons or rhinestones at all, and not even the wishes that you write on the spread of the card. The most important thing is your sincere desire to please your mother, to show care and attention!
Viewed: 6 025
When preparing for the holiday, you not only carefully choose a gift, but also carefully consider the ideas, how to make a postcard with your own hands, which can complement your main gift bought in the store. Paper is the main material that is used to create greeting cards - in different colors, thicknesses and textures, they allow you to achieve the uniqueness of your craft. Thin ribbons, rhinestones, buttons, pieces of fabric are used as additional decorative elements.
How to make a postcard for a teacher with your own hands
Choosing ideas, how to make a postcard for a teacher with your own hands, the student will certainly prefer the options for cards with flowers, leaves, you can arrange the front bar in the form of a school board. Since Teacher's Day is an autumn holiday, decorations can also be in autumn colors. In the school team there are not only women teachers, but also men, for whom schoolchildren always carefully choose presents and congratulations. Like it or not, the entire greeting industry for teachers revolves around female teachers: in the store you can only find greeting cards with bright bouquets that are definitely not suitable for a man. Therefore, we offer you a congratulations option for a male teacher: a bright and original card, the decoration of which will be a paper shirt.
We will need thin cardboard of two colors for work: one color - the main one - this will be the postcard itself in the form of a shirt; another color is a tie, it should be contrasting, stylish. For decoration, we also need to prepare two miniature buttons that will decorate the collar. In progress, how to make a simple DIY postcard, you can not do without the main tool - scissors, it is better to take glue in the form of a pencil so that there are no marks on paper.

The thin cardboard from which you will make the base should be double-sided. The base sheet must be folded in half to make a blank for the future postcard. If necessary, the edges can be cut to make it the shape and size you need. Next, you need to work with scissors: step back about 2 cm from the top and make cuts on the sides of the front bar that will determine the boundaries of the future collar of your shirt. Take a close look at the photos presented in the master class before making cuts on paper.
On the back, cut off a strip with scissors, the same width as we marked the collar, so we select the collar, which will be separated from the rest. Again we turn to the front bar, and finish the design of the collar - we fold the cut strips to the center. They need to be glued to fix the shape of the collar, but only the fold line needs to be glued, leaving the corners free.

Now you have formed the basis of the postcard, and you can proceed to making a tie, for which you will need any paper, it is advisable to choose a contrasting color. We need to measure the desired length and cut out a rectangle. You can immediately cut out the shape of a tie from paper, or you can fold a rectangle to make the tie voluminous. It must be folded as shown in the photo. The finished workpiece must be glued under the collar so that its bottom remains free. It remains only to decorate the collar with buttons, and you can sign a postcard for your favorite teacher.
This idea will also come in handy if you are cooking for dad on February 23 or for his birthday.

How to make a DIY card for mom
Since we have considered the option of a male postcard, now it will be interesting for you to consider a few original ideas, how to make a greeting card for mom. Children always perform with special trepidation, because it must be made with love, be beautiful and neat. For example, you made a beautiful bouquet with your own hands from fabric or paper, and you can attach a congratulatory card to it.

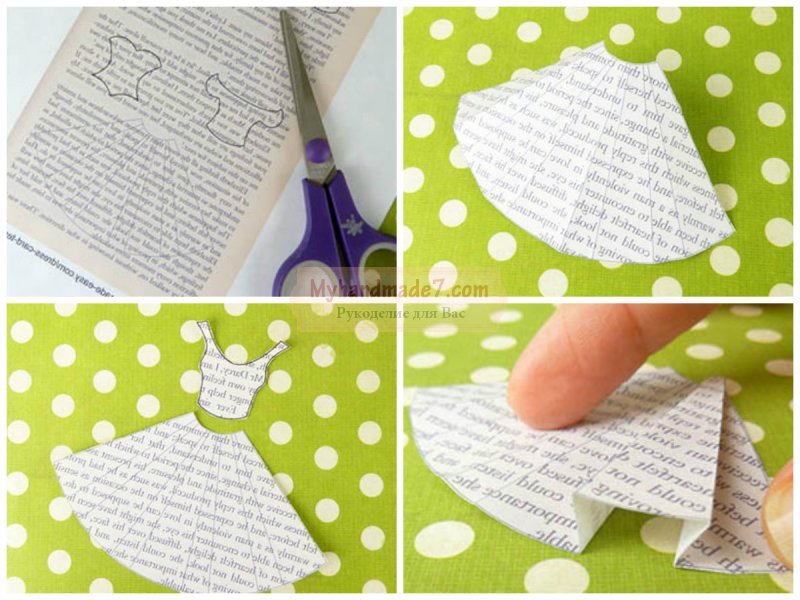
On the “male” postcard, we had a shirt depicted, it is easy to guess that for the female version we will choose a dress as an element of decoration. Idea, how to make a beautiful card with your own hands with a dress, it will also come in handy for the original design of wedding invitations, but in this case, the skirt should be made fluffy, and gentle colors should be chosen for the card itself.
This option is ideal for a preschooler, since it will take no more than half an hour to complete the craft, and just four steps will allow you to make a beautiful and original greeting card. There are other ideas where the dress is folded from bright origami paper. For decoration, you can use openwork napkins with a carved edge, with which you can recreate a fluffy multi-layered white dress.

How to make a postcard easy with your own hands
To work, you will need thick, bright paper, such as rich red, purple or bright yellow. You will also need a white sheet - to decorate the contrasting central part of the postcard, as well as a small piece of satin ribbon to decorate our dress. In the process, you will need glue, a pencil and scissors.
For the base, you need to cut out a rectangle, the card itself must be high so that the dress turns out beautiful. The rectangle should be folded in half: in order for the fold line to turn out to be even, without notches and distortions, you must first lay a ruler along the line and draw it with a blunt thin object, for example, an empty rod from a pen. Now you need to decorate the inside - cut out a white rectangle, its size should be less than half of the base rectangle by about a centimeter in width and height. The finished white rectangle must be glued to the second half of the base, placing it in the middle, leaving a frame of the main color on the sides. You can stick it on a glue stick, carefully smearing the paper around the edges, you can also use double-sided thin tape.
When the base is ready, you can proceed to the second stage of the process, how to make a postcard easy with your own hands. On the front bar with a pencil, without pressing hard, you need to draw the outline of the future dress with a narrow waist and a fluffy skirt. When the outline is drawn and, if necessary, corrected, it can be cut along the line, for this it is better to use not scissors, but a sharp clerical knife, which will allow you to carefully cut out the corners. After you cut the dress along the contour, you will have the central white part of the card “bare”, where you can write a congratulation.
It remains only to decorate it with a bow, which will be tied at the waist. At the fold, it is necessary to make a small incision, where a thin ribbon is threaded, in front it is tied to a bow.

How to make a voluminous postcard with your own hands
If you choose options how to make a DIY postcard, then two ways open before you: firstly, you can decorate the front bar of the greeting card with volumetric elements, glue volumetric flowers, leaves to the surface, and make a picture using the quilling technique. Secondly, three-dimensional elements can only appear when you open a postcard, such crafts are also called 3D. They really turn out bright, colorful and unique.
We will dwell in detail on the technique of creating a 3D card, and even a child can master such a master class. This idea will come in handy if you are still undecided, how to make a card for an elderly person with your own hands, and you can see other options for congratulations.
Be sure to choose bright beautiful paper with a delicate spring pattern for such a craft, which will become the basis for a flower meadow. The base itself will consist of two parts: the first is plain - external, it can be saturated green, the second can be with a delicate light green pattern, you can print the selected template on white thin cardboard yourself. In addition to paper, we need a ruler and a pencil, scissors and glue.

At the first stage of the postcard, it is necessary to draw the inner sheet, as shown in the picture: seven lines in the middle of the long side, between which the distance is 1 cm. To make the lines symmetrical about the middle, note that on each side the distance to the line is 11.5 cm Next, along these lines, you need to make folds to get an accordion of three folds.
Using green paper with various prints, you need to cut grass blanks that are glued between the folds at different levels to achieve a three-dimensional effect. Separately, on white thick paper, you need to print patterns of butterflies, bright and of different sizes, which are then glued to the grass.
For other options, how to make a postcard with your own hands, video you can use master classes, but remember that the beauty of the finished craft depends not so much on skill and careful actions, but on the right materials.

How to make a DIY postcard out of paper
If for every holiday you pick up ideas, how to make a paper card with your own hands, then it's time for you to think about special tools that can greatly facilitate the process of their implementation. We are talking about figured hole punches that will help create an openwork carved edge near a postcard, various decorative elements. With some hole punchers, you can even make even and neat blanks for flower petals.

Small hearts, stars, snowflakes, carved butterflies - all these elements that scrapbooking masters use to decorate postcards, you can do it yourself using curly hole punches. Hole punches with flowers of different sizes will help you create three-dimensional flowers that can beautifully decorate a card for mom and grandmother, for your best friend and sister.

Now you have at your disposal a lot of ideas and master classes, how to make a postcard with your own hands - Day Birthdays, March 8 and February 14 will turn out to be bright, original, and after the holidays only the warmest memories will be preserved. In the manner of Western traditions and in Russia, they are now made in the form of an Easter egg, like valentines, or with the image of an Easter bunny.
Cardmaking or the art of making postcards with your own hands arose not so long ago, but, undoubtedly, many lovers of needlework and creativity have already managed to fall in love. After all, they can embody the most daring and original ideas, transferring their energy to the future gift during creation. It is this warmth of your soul that will be felt in all sincere wishes and kind words of congratulations. A handmade postcard will be a wonderful and very valuable gift.
Moreover, there are plenty of reasons to give it. With the advent of spring comes a touching holiday - International Women's Day. By March 8, you need a lot of gifts to congratulate all women from the bottom of your heart: why not make beautiful postcards for them that are perfect for mom, and grandmother, and sister, and teacher, and girlfriend. In the same way, you can congratulate loved ones on their birthday, and on Angel Day, and on any other holiday (for example, Mother's Day or September 1).
Postcards vary...
First of all, you need to decide what kind of card you want to make:
- the product can be ordinary (flat) or three-dimensional (including 3D modeling);
- single layer or multilayer;
- made using the quilling or scrapbooking technique;
- made in a certain style (for example, shabby chic);
- have a standard look and shape or be made in the form of a silhouette - butterflies, hearts, flower baskets, dresses, etc .;
- contain a lot of different decorations and decor or not.

Of course, the general appearance, format, color, and theme of the future product will depend entirely on who it is intended for. If you are going to make postcards for March 8 with your own hands, then you can stop at spring floral motifs: a bouquet of flowers in a vase or a whole basket of them, decorated with birds and butterflies using the quilling technique, will suit both mother and sister, and congratulate the teacher on On the afternoon of September 1, you can use a beautiful postcard in the style of shabby chic. Any woman will be pleased to receive a luxurious card-dress or a stylish or elegant handbag as a birthday present.
As you can see, the choice is very large, but the main thing is not to get lost in its diversity and stop at the most optimal option.
Such beautiful curls or good old quilling
If someone close to you has a birthday soon, or you urgently need gifts for the 8th of March, try to make a beautiful and uncomplicated spring card using the quilling technique.
To do this, stock up on paper of different colors (take either the one that is designed specifically for quilling, or just double-sided color) and prepare the most necessary tools for work: good scissors (you can also curly, if any), glue, tape (preferably double-sided), cardboard for blanks, a quilling stick, decorations.


And here is another interesting idea for a postcard using the quilling technique.

Scrapbooking, shabby chic style and other interesting ideas
On your mother's birthday, you can present a beautiful and original card-dress. It can be made using the origami technique, or you can make it in the shabby chic style using scrapbooking elements. If you chose the first option, then you just need to cut out and make a model of the dress according to the template and attach it to the base for the postcard, adding additional decorations.
The second option will have to tinker longer.
- There are several types of this product. You can take a cardboard dress pattern and decorate it. That is, glue this blank on the front side of the postcard.
 Then make a puffy skirt (you can take lace, cut it into small pieces and glue it to the base with an overlap), and corrugated paper folded in several layers is perfect for the top.
  Add a beautiful belt and decorate your dress and the space around it with beads, rhinestones and organza ribbon.

- You can also make an original dress from paper napkins. Here you will also need to first cut out a blank - a pattern for the future outfit.
 Then take two types of napkins - ordinary white and colored. A skirt will be made from them. Cut them into halves, fold them together and form a skirt, making it look like an accordion.


 Apply gathered napkins to the waist of your dress patterns (only the white background should be the front side of the dress).
 Then beautifully turn the skirt down and straighten it. Turn over and tie a ribbon at the waist.
  Glue the dress to the postcard and decorate to your taste with rhinestones, beads, sparkles.
- In the same way, you can make a handbag for your mother, and a nice apron for your grandmother by the 8th of March. It is also easy to cut it out according to a pattern, decorate it with ruffles, braid and ribbons, and put cardboard kitchen utensils in the pocket.
From paper napkins, you can also get a very beautiful, exquisite umbrella with flowers or butterflies, which can be presented to both mom and teacher by September 1st.
Gifts are an integral part of any holiday or memorable event, they help express your feelings and make a magnificent, unforgettable surprise for the hero of the occasion, giving memorable memories and a great mood. Gifts are complemented by bouquets of flowers and cards with congratulations, instead of them you can use bright and original greeting cards, which are offered in a wide variety by manufacturers on the market and are produced in huge quantities.
The individuality of each person is emphasized by creative skills, looking at a variety of photos of handmade postcards, you often want to make a hand-made masterpiece yourself and congratulate a close friend or family member.

To do this, just select an original sketch, turn on your imagination, and use various materials to realize any ideas, creating a thematic, greeting card dedicated to any holiday or solemn event.


Types and thematic styles of design
Conventionally, all greeting cards can be divided into several categories, choosing from them you can begin the creative process, the most numerous are:
- postcard in collage style. On a decorated base with a congratulatory or solemn inscription, you can apply images cut out from photos and old postcards, flowers and figures of dear people;
- voluminous, stylish postcards. Inside a pre-prepared postcard, flowers are glued in a special way, connected and cut out of paper or soft cardboard, creating a volume effect when opened;
- postcards in the style of craft. The craft direction of decorating confectionery, gifts and postcards is gaining popularity due to its simplicity and presentable appearance, ease of implementation;
- decorated envelopes for money. Envelopes for money are a special type of greeting cards; they are used as an independent gift and are decorated with pleasant inscriptions or poems.

There are many master classes on how to make a postcard with your own hands, but first you need to decide on the design of this obligatory attribute of the holiday, which will help determine the further manufacturing process and the selection of materials.

What you need to make an original postcard
An original and exclusive postcard will turn out when a drop of imagination is added to ordinary cardboard or colored paper, the creative process of creation begins with the choice of an idea and the selection of materials for its implementation:
- the cardboard used as the basis for the postcard is better to choose dense and high-quality;
- basic decorations, strips of paper, cut out flowers or bright pictures, colored foil;
- additional decorations, which can be beads or beads, paper flowers and ribbons;
- paints and colored pencils, felt-tip pens and other coloring agents used for paper.

Having studied in detail the step-by-step instructions on how to make any postcard, it will become clear that for creativity you will need a set of simple tools, which include a needle and thread, scissors and a simple pencil, glue or a glue gun.

Step by step process of creating a greeting card
Self-made beautiful postcards will delight adults and children, they will be a great addition to a pre-selected gift, having picked up an idea for creating a masterpiece, you can start making it at home:
- base preparation. For this, light cardboard or craft paper is used, which must be bent into two even halves;
- creating a composition. Decorations can be placed on the prepared base, creating an elegant and stylish composition according to the idea;
- fixing jewelry. After adjusting and arranging, you can proceed to fixing the selected decorations on a cardboard base.


In the process of making a postcard, you can also decorate the inner surface of the congratulatory attribute, for this it is better to use elements of the main decorations, in accordance with the general design idea.

After that, it is worth putting a commemorative inscription, selected poems and congratulations, corresponding to the theme of the holiday or the upcoming celebration, a memorable date for which you can time the presentation of a holiday card.

When thinking about making a postcard at home, you need to carefully prepare, then the exciting creative process will become simple and easy, it does not take much time, but it will bring a lot of pleasure to everyone who participates in it.

Children of different ages can be involved in this activity, they will like this pastime, and relatives and friends will be especially pleased with the masterpieces created by the whole family, under the guidance of adults.

DIY photo postcards


DIY Happy Birthday cards are a wonderful holiday attribute. It is often used in schools to create congratulations for students. In labor lessons, many of the readers made their own postcards as children. A lot of time has passed since that moment and today, especially on the Internet, you can find a large number of original postcards for congratulations made by yourself.
The relevance of the gift
Especially for children, many lessons have been created for the development of fine motor skills. At work at the school, they offer to perform various exercises related to the creation of paper products. A postcard would be a great solution for this. In addition to this fact, it is also worth considering that the child is trying to make such products and the process itself brings him pleasure.

The article will consider different ways to create postcards from paper and related materials in different styles. For readers, manufacturing methods will be presented:
- volumetric pictures;
- with the addition of fabric;
- assembled from figures;
- with the addition of confetti;
- and an envelope for money and coins;
- with three-dimensional figures on the main part;
- with the addition of carved images of animals.
It is also worth noting that all the postcards described below can be easily made at school or at home. For this, improvised materials can also be used. The main thing is to use your imagination and be smart.
Table of materials used
Before you start looking at how to make a postcard out of paper and what this may require, you need to make a table of commonly used materials and tools that can come in handy in the process of creating an original gift.
As can be seen from the objects presented in the table, almost all of them can be found at home or bought in the nearest store.
If the smallest readers at school or at home will be engaged in the manufacture of postcards, you must always observe safety precautions and be more careful when using piercing and cutting objects.
You can watch the original solution for making birthday paper cards in the video.
VIDEO: Paper postcard
Master class Do-it-yourself postcard happy birthday
General instructions on the example of 3 postcards
In order to move on to more complex paper products, you need to practice on the simplest ones. To do this, three options for creating paper postcards will be outlined below. Having practiced on these examples, you can move on to more complex instructions for their manufacture.
For the first option, you will need the following set of tools and materials:
- Colored cardboard.
- Colored paper.
- Scissors or utility knife.
- Ordinary writing pen.
- PVA glue or glue stick.
Production time is no more than 15 minutes.

The first thing you need to do is cut out the base in the form of a frame. For this, thick cardboard is used. The color can be any, depending on the preferences of the master himself. The edges of the postcard frame can be made curly, as in the example, using scissors or a clerical knife.
To create even curly frames, it is better to use markings applied using a pattern or a ruler.
A second layer of colored paper is applied on top of the prepared cardboard base. Instead, you can use the image printed on the printer as the main background.
Now the most important task remains connected with the manufacture of festive candles and lights. To do this, you need to use a pen. A thin sheet of colored paper must be wrapped around the handle. The edge where the paper is joined is glued. In this position, it is necessary to maintain the form for 30 seconds. After that, remove the handle. Repeat the action depending on how many candles you need to place on the card.
Separately, lights are cut out of colored paper, after which they are attached to candles. The resulting design is glued to a postcard. After that, it must be signed and written a wish to the birthday man.
The second postcard will have an award medal with the age of the hero of the occasion.

To create it you will need:
- Cardboard as a base.
- Colored paper set.
- Threads.
- Stationery knife or scissors.
- Glue pencil.
You can make such a postcard following the instructions in just half an hour. In order to do everything right, the instructions will be painted step by step.
Instruction
- Preparation of all necessary materials.
- Prepare a base in the form of cardboard of any color at the request of the user.
- Decorate the cardboard with different paper elements.
- Take a thin colored sheet of paper and fold it like an accordion.
- With the help of threads, tie the folded accordion in the middle.
- Spread the accordion so that it has the shape of a circle.
- To fix the edges of the straightened accordion, fix with glue.
- Cut a circle with a smaller radius than the accordion.
- Draw the age of the birthday person or cut and paste numbers from paper.
- Glue the circle onto the accordion.
- Glue the finished medal to the base.
Now everything, the card is ready.
The last postcard for training will have three-dimensional elements.

It will also take a maximum of 30 minutes to create it. To make a postcard you will need:
- Thick colored cardboard as the main background.
- Colored paper with designs or real wrapping paper for gifts.
- Ribbons for dressing.
- Scissors.
- Glue pencil.
The process of making such a postcard consists of the following steps:
- Prepare a cardboard base. The background can be painted or glued additional elements.
- At the top of the card, write the word "Congratulations!".
- Take colored paper or gift wrapping paper and cut it into squares in the shape of wrapped gifts.
- Glue the squares at the bottom of the picture.
- Make ribbon bows and bandages for each of the pasted gifts and attach them to them.
Instead of ribbons, you can also use colored threads or twine.
All is ready. The card looks quite bright and interesting and has three-dimensional elements in the form of gifts and bows.
Volumetric 3D postcard
Now more complex options for paper postcards will be considered. Postcards containing 3D elements will be presented first.

To create a product you will need:
- Several sheets of thick colored cardboard.
- Scissors.
- Glue pencil.
- Colored paper set.
The first thing to do is a thick book cover. To do this, several cardboard sheets are glued together and folded in half.
On the outside of such a cover, you can write congratulations and wishes, as well as place elements cut out of paper.
Now he opens the resulting cover, and we mark out the pyramid of future gifts in the center of the open cover. The workpiece is cleaved in half so that the corner from the gift boxes begins to protrude when opened forward. Next, the base of the gifts is cut, except for the places where they are attached to the main sheet. Glue the resulting blank to the cover.
Places where gifts will appear at the opening do not need to be glued.
When the glue dries, it is necessary to decorate the pyramid of gifts that protrudes when opening and glue a bow at the very top.
Cards from paper with the addition of fabric
To create a postcard with a fabric, you will need the same composition of tools and accessories. The only thing that needs to be added is different types of fabric.

In a future postcard, fabric will replace colored paper. It is attached to the base in the form of cardboard. It is noteworthy that such a product looks quite interesting and pleasant to the touch. For reliable fixation of all elements on cardboard, it is better to use PVA stationery glue.
However, you should be careful. Many types of fabrics absorb moisture well. If you overdo it with glue, after drying, traces will remain on the material, which will spoil the whole general appearance of the postcard.
From the shape of a heart
For the next type of postcard, you will need a flat heart shape. It is better to print it on a printer on colored paper or find a good and large template to circle around it. You need to be careful if the edges of the heart are not even, the envelope postcard will not work.

It is also advised to use gift wrap instead of colored paper. All actions are designed for 5 steps:
- A template is prepared and a heart is cut out.
- Flips back to user.
- The sides of the heart fold evenly.
- The heart is turned over and the part that turned out to be below is folded to half of the product.
- The top part becomes the lid of the envelope. Sides for fixing are glued.
On such an envelope from the front, you can stick a small bow or ribbon.
With confetti
Confetti is always a holiday. In order to make it, you do not need to go and purchase specially homemade fireworks. A hole punch and a set of colored paper of all colors of the rainbow will help to solve this problem.
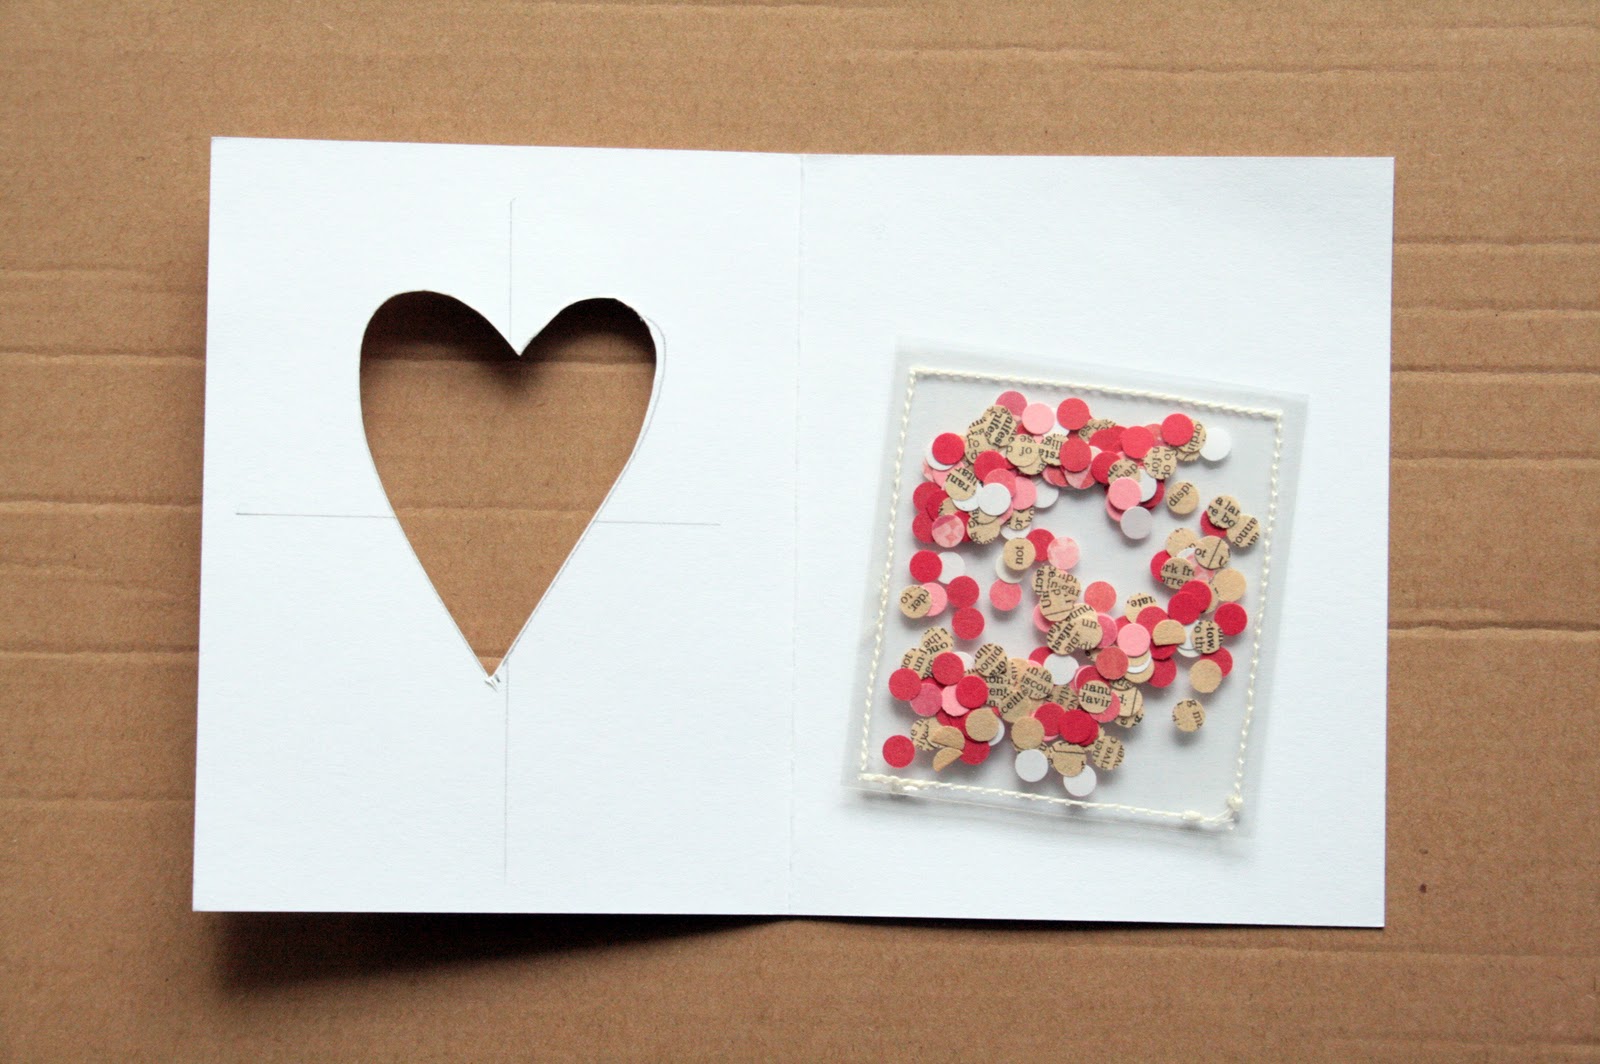
First you need to make a base out of cardboard. It can be any color. It is better to make a postcard in the form of a frame. To do this, a large cardboard sheet is folded by grinding to form an isosceles triangle.
A base is glued to one part of it. To diversify it, you can make an envelope as shown in the figure. It is better to use thick cellophane or transparent paper for this.
Having fixed an envelope or other transparent object with glue, you need to make confetti. To do this, take a hole punch and a set of paper of different colors. Now cuts are made with a tool. The shavings have a smooth circle shape and look like confetti. Parts of the circles are glued onto the postcard, and the other part is placed in an envelope.
